The Ensoniq TS12 hompages - Unscrew the Synthesizer

The Ensoniq TS12 homepages

Start

Extensions

Demosongs

Downloads

Errors

Links

second hand

Specification

Support


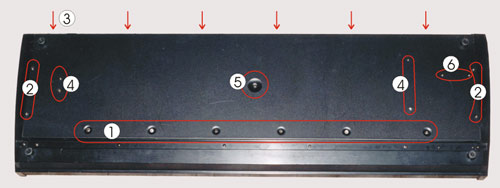
unscrew the synthesizer

baseplate

mainboard

DA adapter card

floppy drive

controller

keyboard

keys

hammer

rubber contacts


Forum


Advertising

1. Opening the baseplate.

Lay the TS12 on its face. (on a pad or something like this), then screw up the red marked screws in arbitrary order

Legend:
  1. Screw connection of the baseplate in the front aluminium profile. self-tapping screws 4 x 5 mm
  2. Screw connection of the baseplate in the side of the chassis. 4 x 5 mm metric
  3. Screw connection of the baseplate in the back of the chassis 4 x 5 mm metric
  4. Screw connection to the brackets, which fix the keyboard. 4 x 5 mm metric
  5. Screw connection direct to the keyboard. 4 x 10 mm! metric
  6. Screw connection to the bracket of the floppy drive. self-tapping screws 4 x 10 mm

After that, shift the baseplate to the backside of the synthesizer (ca 5 mm) and lift it with a srewdriver. Attention, the edges of the baseplate are not debured (risk of injury, I've had this experience)

Step two:

removing the mainboard

by avaris webdesign

Examples